Difference between revisions of "How to install custom widgets to TV"
(How to install custom widgets.) |
m |
||
| (3 intermediate revisions by the same user not shown) | |||
| Line 1: | Line 1: | ||
INSTALLATION of Internet@TV widgets (B series) or SmartHub applications (C and D series) | INSTALLATION of Internet@TV widgets (B series) or SmartHub applications (C and D series) | ||
= On PC = | = On PC = | ||
| − | == Server for widgets == | + | ==Easy way == |
| + | Use '''[http://forum.samygo.tv/viewtopic.php?f=21&t=6560 SmartHub Widget Manager app]''' | ||
| + | ==Long way== | ||
| + | === Server for widgets === | ||
To install your custom widgets, you have to run a http server on your local network.<br> | To install your custom widgets, you have to run a http server on your local network.<br> | ||
Here are a lot of variants, here is a '''xampp apache web server''' as example:<br> | Here are a lot of variants, here is a '''xampp apache web server''' as example:<br> | ||
| Line 14: | Line 17: | ||
The root of www server (htdocs for xampp) must contain a file widgetlist.xml | The root of www server (htdocs for xampp) must contain a file widgetlist.xml | ||
| − | == widgetlist.xml == | + | === widgetlist.xml === |
The file must be like this: | The file must be like this: | ||
<?xml version="1.0" encoding="UTF-8"?> | <?xml version="1.0" encoding="UTF-8"?> | ||
| Line 48: | Line 51: | ||
= On TV = | = On TV = | ||
== Create the developer account == | == Create the developer account == | ||
| + | {{#ev:youtube|00CrLLtp-SE| |right|Use "develop" as login name (NOT e-mail address!). Example video from: [http://movl.com/ movl].}} | ||
<br> | <br> | ||
1. Enter the menu by pressing the button on the remote Internet@YB (or SmartHub)<br> | 1. Enter the menu by pressing the button on the remote Internet@YB (or SmartHub)<br> | ||
| Line 55: | Line 59: | ||
5. Exit SmartHUb and reboot TV | 5. Exit SmartHUb and reboot TV | ||
<br> | <br> | ||
| + | |||
== Add and update the list of widgets == | == Add and update the list of widgets == | ||
1. Download the wanted widget for Samsung TV<br> | 1. Download the wanted widget for Samsung TV<br> | ||
Latest revision as of 06:56, 22 September 2013
INSTALLATION of Internet@TV widgets (B series) or SmartHub applications (C and D series)
Contents
On PC
Easy way
Use SmartHub Widget Manager app
Long way
Server for widgets
To install your custom widgets, you have to run a http server on your local network.
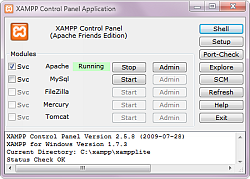
Here are a lot of variants, here is a xampp apache web server as example:
1. Download the application XAMPP
2. Install it
3. In the main installation folder, locate and run xampp-control.exe.
4. Press the Start button next to the name Apache. Should show up next to the inscription Running.

Place your downloaded widget (zip archive) to htdocs/Widget directory The root of www server (htdocs for xampp) must contain a file widgetlist.xml
widgetlist.xml
The file must be like this:
<?xml version="1.0" encoding="UTF-8"?>
<rsp stat="ok">
<list>
   <widget id="Facebook">
       <title>Facebook</title>
       <compression size="1656763" type="zip"/>
       <description></description>
       <download>http://192.168.1.10/Widget/Facebook_1_Europe_20100923.zip</download>
   </widget>
   <widget id="Today">
       <title>USA Today News</title>
       <compression size="517608" type="zip"/>
       <description></description>
       <download>http://192.168.1.10/Widget/Today_0001_Europe_20100925.zip</download>
   </widget>
</list>
</rsp>
Where:
widget id: your widget ID (what ever you want)
title: Your widget title
compression size: size of zipped archive in bytes
download: points a directory and zip file with widget
You can also install a few widgets by adding a given file more entries between the marker and <list> </ list> (as shown on example).
On TV
Create the developer account
1. Enter the menu by pressing the button on the remote Internet@YB (or SmartHub)
2. After loading the widget, go to Settings
3. and then Create an account.
4. Enter the name: develop and password(any)
5. Exit SmartHUb and reboot TV
Add and update the list of widgets
1. Download the wanted widget for Samsung TV
2. Unpack the archive to a directory located in the htdocs directory XAMPP program.
3. Using a text editor open the file widgetlist.xml and change the IP address on the local IP address of your computer.
4. Run Internet@TV (or SmartHub)
5. Login to developer account (Press the RED button to login. )
6. Select an account develop and enter the password.
7. Go into Settings.
8. Choose a new developer options, and then setup the IP Address.
9. Enter the IP address of your PC, where web server is running
10. Select Widget synchronization.
11. Wait until the installation is complete and the message "Service installed." - Press Enter.
12. The new widget should appear in the list (check the BLUE button).
13. We can log out of your account (RED button).
If you have an external IP for widget synchronization (eg for NetPlayer), you can enter it in step 9.
WARNING! If when you try to install nothing happens, or TV to restart - try turning off your computer firewall (Firewall).
If the Internet @ TV does not boot - unplug the network cable, run the Internet @ TV and when to load a blank panel,
connect the cable and run it again.
References
http://forum.samygo.tv/viewtopic.php?f=1&t=892&start=10#p7713
http://samygo.ugu.pl/faq/#Internet_widgets
Personal experience
To Be Updated