Difference between revisions of "Calibration"
m |
|||
| (5 intermediate revisions by 2 users not shown) | |||
| Line 9: | Line 9: | ||
The TV will only allow you to calibrate the current selected source. | The TV will only allow you to calibrate the current selected source. | ||
| − | To calibrate the AV (Tuner, USB, ) you have to plug in a MediaPlayer which is connected to the AV Interface. I used a Iomega Screenplay TV Link device, but others AV-Devices like, DVD Player, XBox, PC with Composite ... are also usable. | + | To calibrate the AV (Tuner, USB, AV) you have to plug in a MediaPlayer which is connected to the AV Interface. I used a Iomega Screenplay TV Link device, but others AV-Devices like, DVD Player, XBox, PC with Composite ... are also usable. |
Copy the follow Picture to a USB key and Plug it to your MediaPlayer - at least you should see the picture (best fullscreen) on your TV. | Copy the follow Picture to a USB key and Plug it to your MediaPlayer - at least you should see the picture (best fullscreen) on your TV. | ||
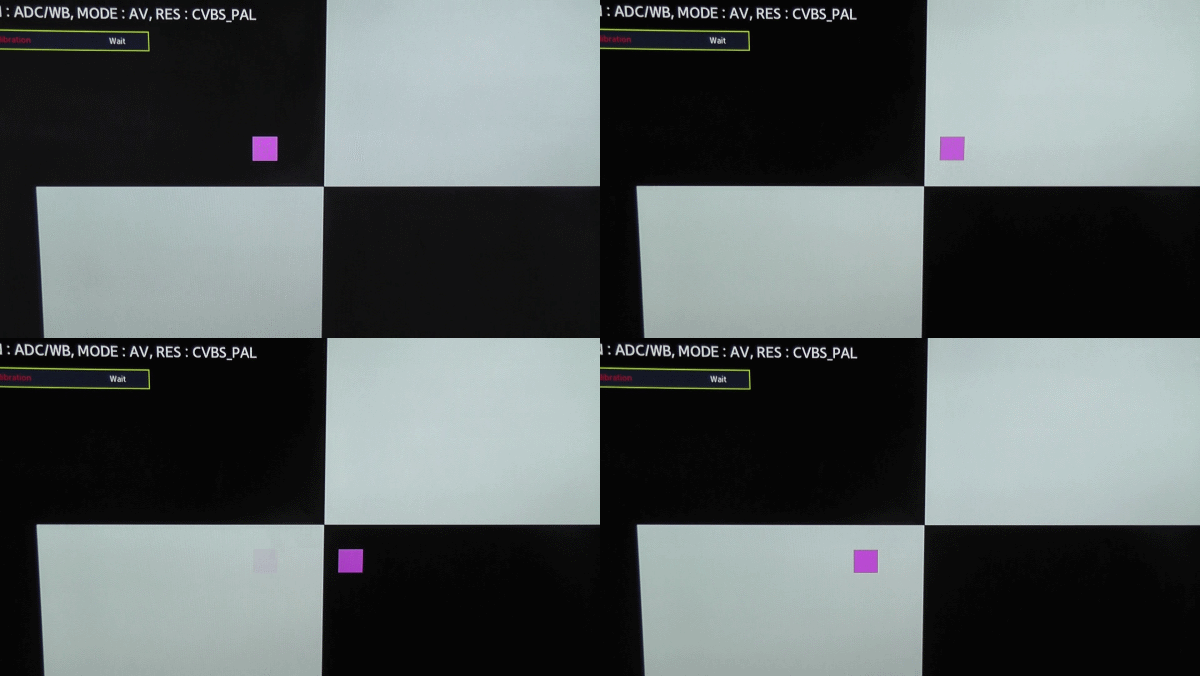
Now in Service Menu do a new calibration - you will see a pink square jumping from black (upper left) to white (upper right) to black (button right) and last to white (bottom left). After that procedure you will see again Success. | Now in Service Menu do a new calibration - you will see a pink square jumping from black (upper left) to white (upper right) to black (button right) and last to white (bottom left). After that procedure you will see again Success. | ||
| + | |||
| + | [[File:Calibration.gif]] | ||
| + | |||
| + | When the Calibration stick somewhere and finally fail, than you have to adjust the values (by me there was only the first two) from "ADC/WB -> ADC Results" so that black and white looks nearly okay - than retry calibration. Look, that the pink square hit every time INSIDE the big squares - when I comes to a line it will fail. | ||
The same way you do it for HDMI when it is failed. | The same way you do it for HDMI when it is failed. | ||
Picture for calibration: | Picture for calibration: | ||
| − | [[File:BW-Cubes.png]] | + | [[File:BW-Cubes.png|400px|thumb|left|Picture for calibration]] |
| − | + | <br><br><br><br><br><br><br><br><br><br><br><br><br><br><br><br><br><br><br><br> | |
| − | This HowTo is tested on a D5700 Samsung TV but will work on others models too. | + | '''This HowTo is tested on a D5700 Samsung TV but will work on others models too.''' |
Latest revision as of 01:43, 30 December 2011
This Page will help you to calibrate your Samsung TV. I recommend you only use it in emergency - don't do it when it is not needed.
Mostly you will need to calibrate when you made a mistake and start the calibration in Service Menu with the right/left button.
So you need to recalibrate when you see Failure
There are different sources to calibrate: AV, Comp, PC, HDMI - so you need first to switch to the source to calibrate them.
The TV will only allow you to calibrate the current selected source.
To calibrate the AV (Tuner, USB, AV) you have to plug in a MediaPlayer which is connected to the AV Interface. I used a Iomega Screenplay TV Link device, but others AV-Devices like, DVD Player, XBox, PC with Composite ... are also usable.
Copy the follow Picture to a USB key and Plug it to your MediaPlayer - at least you should see the picture (best fullscreen) on your TV.
Now in Service Menu do a new calibration - you will see a pink square jumping from black (upper left) to white (upper right) to black (button right) and last to white (bottom left). After that procedure you will see again Success.
When the Calibration stick somewhere and finally fail, than you have to adjust the values (by me there was only the first two) from "ADC/WB -> ADC Results" so that black and white looks nearly okay - than retry calibration. Look, that the pink square hit every time INSIDE the big squares - when I comes to a line it will fail.
The same way you do it for HDMI when it is failed.
Picture for calibration:
This HowTo is tested on a D5700 Samsung TV but will work on others models too.

