Difference between revisions of "UnBricking TV by EEPROM Reset"
m (→Reseting NVRAM (EEPROM)) |
m |
||
| (30 intermediate revisions by 7 users not shown) | |||
| Line 1: | Line 1: | ||
| − | This | + | Here we will show you how to reset your TV by resetting the SoC EEPROM. This can be very useful in case you have bricked your TV by messing with some of its internal settings, which can easily happen if you mess around in the Service Menu. It is highly recommended to take photos of each screen in the service menu, showing your original firmware settings, before changing anything! |
| − | + | =Blind Factory Reset= | |
| + | Before trying to EEPROM reset, please try a factory reset, that might revive your TV also. | ||
| − | + | Press "EXIT" button for 12 seconds (15 is better since you cannot see TV), than press "Left" and "Enter" | |
| − | Also you needed to find correct values for your TV after resetting NVRAM like Model / Type / Tuner / Font Color and others. It's better to have screen shots of your service menu. You can also ask help from our forums. | + | [http://www.samsung.com/us/support/supportOwnersHowToGuidePopup.do?howto_guide_seq=5306&prd_ia_cd=N0000058&map_seq=31175 Samsung Documentation] |
| + | |||
| + | |||
| + | '''This wiki entry will not help resolve a TV bricked by firmware flashing.''' | ||
| + | |||
| + | One example (from the original post of this wiki): | ||
| + | ''This is Erdem. As I bricked my D series device by miss service menu setting, I search for solutions to recover it. | ||
| + | After with help of Juzis we unbricked device with the same way of C series TVs... Here I wanted to try to let | ||
| + | you know how the process is working. Firstly, this hack doesn't work if you bricked you device by | ||
| + | firmware flashing... This hacks just removes service menu settings and let you give another chance | ||
| + | to fix settings... Also you needed to find correct values for your TV after resetting NVRAM like | ||
| + | Model / Type / Tuner / Font Color and others. It's better to have screen shots of your service menu. | ||
| + | You can also ask help from our forums.'' | ||
=EEPROM= | =EEPROM= | ||
| − | EEPROM is a short of ''electrically erasable programmable read only memory'', which is actually a chip. | + | EEPROM is a short of ''electrically erasable programmable read only memory'', which is actually a chip. There are several EEPROM chips used in Samsung TVs. All service menu settings are kept in the so called SoC EEPROM. You can delete and reprogram this chips millions time. So they are fast and reliable... |
=Reseting NVRAM (EEPROM)= | =Reseting NVRAM (EEPROM)= | ||
| − | For resetting TV, settings, you needed to remove EEPROM device from TV. But it's not required. In electronic world, if you disable communication of the chip, it counts as removed. So we just needed to kill communication of EEPROM. | + | For resetting TV, settings, you needed to remove SoC EEPROM device from TV. But it's not required. In electronic world, if you disable communication of the chip, it counts as removed. So we just needed to kill communication of SoC EEPROM. EEPROMs on Samsung TV's communicating via common i2c protocol. That protocol carries data via SDA line and send clocks via SCL line. In our situation, both blocking SCL or SDA will works. But I decide SDA. |
To do this, all you have to do that feeding (connecting) GND (ground) or VCC (3.3v) to SDA line with little wire... That's all. Since this lines are HIGH (v3.3) in IDLE, its better to hold it via VCC. You can also hold this lines via GND too. But don't try to connect both GND and VCC. It will be short circuit and probably will damage your board. | To do this, all you have to do that feeding (connecting) GND (ground) or VCC (3.3v) to SDA line with little wire... That's all. Since this lines are HIGH (v3.3) in IDLE, its better to hold it via VCC. You can also hold this lines via GND too. But don't try to connect both GND and VCC. It will be short circuit and probably will damage your board. | ||
| Line 21: | Line 34: | ||
[[File:UE40D5000 RESET MESSAGE.JPG|center|300px| UE40D5000 Reset message]] | [[File:UE40D5000 RESET MESSAGE.JPG|center|300px| UE40D5000 Reset message]] | ||
| − | =Where | + | =Where do I find the SoC EEPROM chip?= |
| − | :Its located near CPU at C and D series. On top, it writes some numbers and letters starting with 24256 or 24512... Here I place some screen shots from D series bellow. In my TV, 24512 EEPROM chip used. You can get the [http://pdf1.alldatasheet.com/datasheet-pdf/view/22813/STMICROELECTRONICS/M24512-RBN6.html 24512 Chip Datasheet here]. In picture, white triangle shows the first pin. | + | :Its located near CPU (SoC) at C and D series. On top, it writes some numbers and letters starting with 24256 or 24512... Here I place some screen shots from D series bellow. In my TV, 24512 EEPROM chip used. You can get the [http://pdf1.alldatasheet.com/datasheet-pdf/view/22813/STMICROELECTRONICS/M24512-RBN6.html 24512 Chip Datasheet here]. In picture, white triangle shows the first pin. |
| + | ==B Series SoC EEPROM Location== | ||
| + | ===LExxB550=== | ||
| + | You have to search for eeprom on '''back side''' of mainboard. IC3001<br><br> | ||
| + | [[Image:LExxB55x_mainboard_front.JPG|270px|B550 mainboarboard front side]] | ||
| + | [[Image:LE46B550A5W full.jpg|270px|B550 mainboarboard back side]] | ||
| + | [[Image:LExxB550_eeprom.png|270px|B550 eeprom reset. Red line!]] | ||
| + | ===LExxB6000=== | ||
| + | [[Image:Samsung_UExxB6000_mainboard.jpg|250px|B6000 mainboarboard]] | ||
| + | [[Image:Samsung_UE32_B6000_eeprom_reset.jpg|270px|eeprom location, reset procedure]] | ||
| − | ==C Series EEPROM Location== | + | ==C Series SoC EEPROM Location== |
| − | === | + | ===LExxC550/530=== |
[[Image:C550_full.jpg|270px|C550/530 Board]] | [[Image:C550_full.jpg|270px|C550/530 Board]] | ||
[[Image:C550_reset.jpg|200px|C550/530 reset. Red line!]] | [[Image:C550_reset.jpg|200px|C550/530 reset. Red line!]] | ||
| Line 38: | Line 60: | ||
[[Image:UA40C6200_full.jpg|150px|UA40C6200 Board]] | [[Image:UA40C6200_full.jpg|150px|UA40C6200 Board]] | ||
[[Image:UA40C6200_1.jpg|285px|UA40C6200 reset]] | [[Image:UA40C6200_1.jpg|285px|UA40C6200 reset]] | ||
| + | ===UExxC7700=== | ||
| + | <gallery> | ||
| + | Image:DSC 0272 resized marked.jpg|UE46C7700 Board (back side of mainboard) | ||
| + | Image:DSC 0273 resized.jpg|UE46C7700 eeprom | ||
| + | </gallery> | ||
| + | |||
===OTHER=== | ===OTHER=== | ||
please fill up missing models. Thanks! | please fill up missing models. Thanks! | ||
<br> | <br> | ||
| − | ==D Series EEPROM Location== | + | |
| + | ==D Series SoC EEPROM Location== | ||
===D5000=== | ===D5000=== | ||
<gallery> | <gallery> | ||
| Line 52: | Line 81: | ||
Image:UE40D5003_Board.jpg|UE40D5003 Board | Image:UE40D5003_Board.jpg|UE40D5003 Board | ||
Image:UE40D5003_EEprom_reset.jpg|UE40D5003 EEPROM Chip and UnBrick way | Image:UE40D5003_EEprom_reset.jpg|UE40D5003 EEPROM Chip and UnBrick way | ||
| + | </gallery> | ||
| + | |||
| + | ===D550=== | ||
| + | <gallery> | ||
| + | Image:le32d550_mainboard.jpg|LExxD550 Board | ||
| + | Image:le32d550_eeprom.jpg|LExxD550 EEPROM Chip and UnBrick way | ||
</gallery> | </gallery> | ||
| Line 58: | Line 93: | ||
Image:UA40D6000_Board_EEPROM.jpg|UA40D6000 Board | Image:UA40D6000_Board_EEPROM.jpg|UA40D6000 Board | ||
Image:EEPROM_Reset.jpg|UA40D6000 EEPROM Chip and UnBrick way | Image:EEPROM_Reset.jpg|UA40D6000 EEPROM Chip and UnBrick way | ||
| + | </gallery> | ||
| + | |||
| + | ==BD (BlueRay DVD Player) SoC EEPROM Location== | ||
| + | ===BD-D8X00=== | ||
| + | <gallery> | ||
| + | Image:Bd-d8900_Board.png|BD-D8900 Board | ||
| + | Image:Bd-d8900_Eprom.png|BD-D8900 EEPROM Chip and UnBrick way | ||
| + | </gallery> | ||
| + | |||
| + | ===BD-E8X00=== | ||
| + | <gallery> | ||
| + | Image:Bd-e8300_Board.png|BD-D8900 Board | ||
| + | Image:Bd-e8300_Eprom.png|BD-D8900 EEPROM Chip and UnBrick way | ||
| + | </gallery> | ||
| + | |||
| + | ==ES-series SoC EEPROM Location== | ||
| + | This may also be compatible with the "E"-series... | ||
| + | Do check forums for latest info. | ||
| + | |||
| + | ===UNxxES7500, UE55ES8090=== | ||
| + | <gallery> | ||
| + | Image:UNxxES7500_Eeprom_location.jpg|UNxxES7500 Board | ||
| + | Image:UNxxES7500_Eeprom.jpg|UNxxES7500 Reset EEPROM | ||
| + | </gallery> | ||
| + | |||
| + | ==F series SoC EEPROM location== | ||
| + | |||
| + | ===UExxFxxxx=== | ||
| + | Applicable for TV models with mainboard: '''BN41-01958A/BN41-01958B''': | ||
| + | <br> | ||
| + | *UExxF45xx<br> | ||
| + | *UExxF53xx<br> | ||
| + | *UExxF55xx<br> | ||
| + | *UExxF62xx<br> | ||
| + | *UExxF63xx<br> | ||
| + | *UExxF64xx<br> | ||
| + | *UExxF65xx<br> | ||
| + | *UExxF66xx<br> | ||
| + | *UExxF68xx<br> | ||
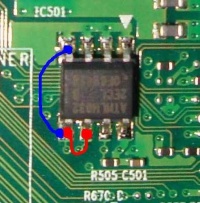
| + | Main eeprom: IC901 (ATMLH348 or AT24C256). Unbricking possible two ways: Short circuit on RED or BLUE. | ||
| + | <gallery> | ||
| + | Image:UExxFxxx.jpg|BN41-01958A/B | ||
| + | </gallery> | ||
| + | |||
| + | ===UExxF8000=== | ||
| + | <gallery> | ||
| + | Image:UExxF8000.jpg|UExxF8000 | ||
</gallery> | </gallery> | ||
Latest revision as of 19:30, 16 June 2017
Here we will show you how to reset your TV by resetting the SoC EEPROM. This can be very useful in case you have bricked your TV by messing with some of its internal settings, which can easily happen if you mess around in the Service Menu. It is highly recommended to take photos of each screen in the service menu, showing your original firmware settings, before changing anything!
Contents
- 1 Blind Factory Reset
- 2 EEPROM
- 3 Reseting NVRAM (EEPROM)
- 4 Where do I find the SoC EEPROM chip?
Blind Factory Reset
Before trying to EEPROM reset, please try a factory reset, that might revive your TV also.
Press "EXIT" button for 12 seconds (15 is better since you cannot see TV), than press "Left" and "Enter"
This wiki entry will not help resolve a TV bricked by firmware flashing.
One example (from the original post of this wiki):
This is Erdem. As I bricked my D series device by miss service menu setting, I search for solutions to recover it.
After with help  of Juzis we unbricked device with the same way of C series TVs... Here I wanted to try to let
you know how the process is working. Firstly, this hack doesn't work if you bricked you device by
firmware flashing... This hacks just removes service menu settings and let you give another chance
to fix settings... Also you needed to find correct values for your TV after resetting NVRAM like
Model / Type / Tuner / Font Color and others. It's better to have screen shots of your service menu.
You can also ask help from our forums.
EEPROM
EEPROM is a short of electrically erasable programmable read only memory, which is actually a chip. There are several EEPROM chips used in Samsung TVs. All service menu settings are kept in the so called SoC EEPROM. You can delete and reprogram this chips millions time. So they are fast and reliable...
Reseting NVRAM (EEPROM)
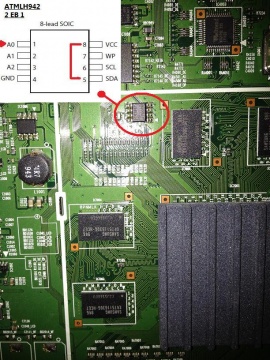
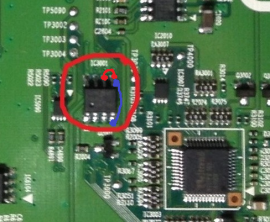
For resetting TV, settings, you needed to remove SoC EEPROM device from TV. But it's not required. In electronic world, if you disable communication of the chip, it counts as removed. So we just needed to kill communication of SoC EEPROM. EEPROMs on Samsung TV's communicating via common i2c protocol. That protocol carries data via SDA line and send clocks via SCL line. In our situation, both blocking SCL or SDA will works. But I decide SDA.
To do this, all you have to do that feeding (connecting) GND (ground) or VCC (3.3v) to SDA line with little wire... That's all. Since this lines are HIGH (v3.3) in IDLE, its better to hold it via VCC. You can also hold this lines via GND too. But don't try to connect both GND and VCC. It will be short circuit and probably will damage your board.
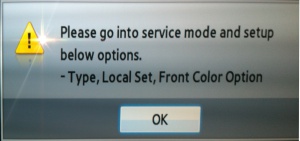
Join VCC and SDA, power on TV and hold about for 20 seconds with the TV powered. It just try to read (wrong) settings from EEPROM, since it cannot read anything (refer to the warning message bellow), just start with defaults. That is what we want. Than releasing SDA line and shutting TV off will update the settings on EEPROM with null values, that TV could boot with it. After all, you can enter service menu and change the required changes.
Where do I find the SoC EEPROM chip?
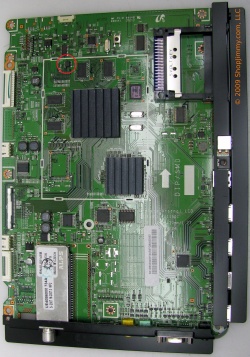
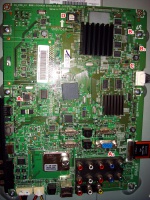
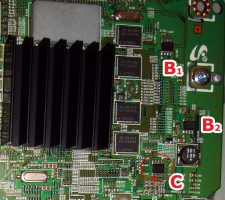
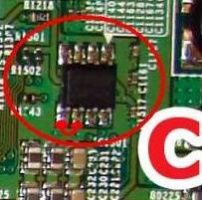
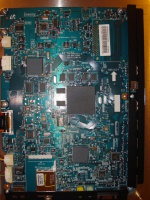
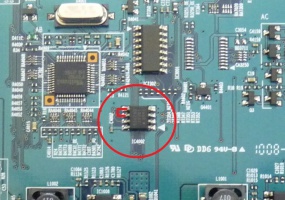
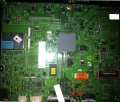
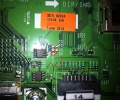
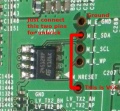
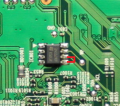
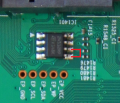
- Its located near CPU (SoC) at C and D series. On top, it writes some numbers and letters starting with 24256 or 24512... Here I place some screen shots from D series bellow. In my TV, 24512 EEPROM chip used. You can get the 24512 Chip Datasheet here. In picture, white triangle shows the first pin.
B Series SoC EEPROM Location
LExxB550
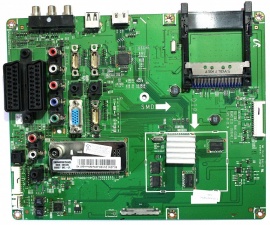
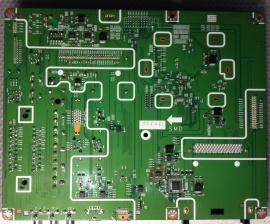
You have to search for eeprom on back side of mainboard. IC3001
LExxB6000
C Series SoC EEPROM Location
LExxC550/530
LAxxC650
UAxxC6200
UExxC7700
OTHER
please fill up missing models. Thanks!
D Series SoC EEPROM Location
D5000
D4003/5003
D550
D60xx/61xx/62xx/63xx/64xx/65xx/66xx/67xx/68xx
BD (BlueRay DVD Player) SoC EEPROM Location
BD-D8X00
BD-E8X00
ES-series SoC EEPROM Location
This may also be compatible with the "E"-series... Do check forums for latest info.
UNxxES7500, UE55ES8090
F series SoC EEPROM location
UExxFxxxx
Applicable for TV models with mainboard: BN41-01958A/BN41-01958B:
- UExxF45xx
- UExxF53xx
- UExxF55xx
- UExxF62xx
- UExxF63xx
- UExxF64xx
- UExxF65xx
- UExxF66xx
- UExxF68xx
Main eeprom: IC901 (ATMLH348 or AT24C256). Unbricking possible two ways: Short circuit on RED or BLUE.
