Difference between revisions of "Ex-Link Cable for J/K/M/Q/N/QN Series"
m (Juuso moved page Ex-Link Cable for J/K Series to Ex-Link Cable for J/K/M/Q Series: confirmed to be working on Q series as well. Supposed to work on M series indeed.) |
|||
| (6 intermediate revisions by 2 users not shown) | |||
| Line 1: | Line 1: | ||
| − | == Wired | + | == Wired Ex-Link cable == |
| − | [[File:JU7100-inputs-side-large.jpg|200px|thumb|right|JU7100]]On some J/K-series TV, Ex-Link port is located on the separate 3.5mm jack labelled as "EX-LINK". | + | [[File:JU7100-inputs-side-large.jpg|200px|thumb|right|JU7100]]On some J/K-series TV and on M/Q series Tv`s, Ex-Link port is located on the separate 3.5mm jack labelled as "EX-LINK". |
| + | On Q series Ex-Link port is located on bottom of OneConect box, next to CI slot. | ||
| − | In this case, you need to make Ex-link cable by connecting JACK male to the USB-COM adapter(not TTL/LVTTL) as shown below. | + | In this case, you need to make Ex-link cable by connecting JACK male to the USB-COM adapter ({{red|'''not''' TTL/LVTTL}}) as shown below. |
[[File:Img.jpg|500px]] | [[File:Img.jpg|500px]] | ||
Or you can use regular COM port, if your PC have it, but in this case you have to connect pins in reverse order (from left to right) as shown below. You need 2, 3 and 5 pin. | Or you can use regular COM port, if your PC have it, but in this case you have to connect pins in reverse order (from left to right) as shown below. You need 2, 3 and 5 pin. | ||
| + | |||
| + | If your PC does not have COM port (like many pc`s nowadays), you can use cheap '''[https://www.aliexpress.com/wholesale?ltype=wholesale&d=y&origin=y&isViewCP=y&spm=2114.01010208.8.42.NMUo8j&initiative_id=QRW_20170607091544&SearchText=usb+rs232+db9+cable&productId=32672290017&blanktest=0&tc=af USB to RS232 COM Port Serial PDA 9 pin DB9 Cable Adapter ]'''. | ||
[[File:Db9-pinout.png]] | [[File:Db9-pinout.png]] | ||
| + | == USB Ex-Link cable == | ||
| + | Tested on UE32K5502 TV. On other TV models there may be differences. | ||
| + | ===Service menu=== | ||
| + | First you need enable USB Ex-Link for your TV in service menu. Try sequence <code>Info -> Menu -> Mute -> Power</code> or <code>Info -> Settings -> Mute -> Power</code> when TV turned off (may not work). Other way - if you have root, you can start service menu with command <code>launch_app org.tizen.factory</code>. | ||
| + | |||
| + | In service menu, go to Control -> Sub Option, change <code>RS-232 Jack - Debug</code>, <code>EXT Link Support - ON</code>, <code>USB Serial - ON</code>. You can also set <code>Watchdog - OFF</code>. On the other TV model, these options can be in another place of the service menu. | ||
| + | |||
| + | [[File:K_SERVICE_USB.JPG|500px]] | ||
| + | ===Cable=== | ||
| + | My TV have USB ExLink UART with 0V/3.3V voltage level. {{red|'''Not''' RS232}} which can have -25V/+25V voltage level - see https://www.electronics-notes.com/articles/connectivity/serial-data-communications/rs232-signal-voltage-levels.php | ||
| + | |||
| + | Maybe other models will be with RS232, so it's better to check voltage before plugging something in Ex-Link enabled USB port. You accept that you do everything at YOUR OWN RISK. | ||
| + | |||
| + | After making changes in the service menu, one of USB port will stop work like USB (TV will not detect flash drive plugged in it) - this USB port you need to use. Yon need some USB-UART 3.3V - like Nokia data cable CA-42/DKU-5. Connect UART wires to USB wires: | ||
| + | TV USB GND to GND UART | ||
| + | TV USB DATA- to RX UART | ||
| + | TV USB DATA+ to TX UART | ||
| + | [[File:USB.jpg|500px]][[File:UART_USB.jpg|500px]] | ||
| + | |||
== Enable Debug mode in service menu == | == Enable Debug mode in service menu == | ||
todo | todo | ||
Latest revision as of 11:04, 30 January 2021
Contents
Wired Ex-Link cable
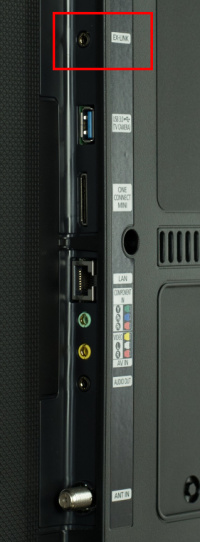
On some J/K-series TV and on M/Q series Tv`s, Ex-Link port is located on the separate 3.5mm jack labelled as "EX-LINK".
On Q series Ex-Link port is located on bottom of OneConect box, next to CI slot.
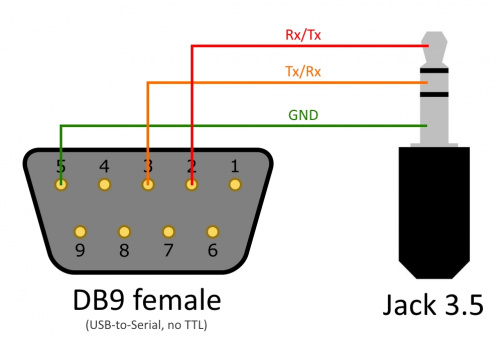
In this case, you need to make Ex-link cable by connecting JACK male to the USB-COM adapter (not TTL/LVTTL) as shown below.
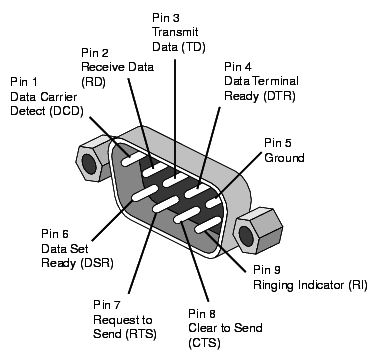
Or you can use regular COM port, if your PC have it, but in this case you have to connect pins in reverse order (from left to right) as shown below. You need 2, 3 and 5 pin.
If your PC does not have COM port (like many pc`s nowadays), you can use cheap USB to RS232 COM Port Serial PDA 9 pin DB9 Cable Adapter .
USB Ex-Link cable
Tested on UE32K5502 TV. On other TV models there may be differences.
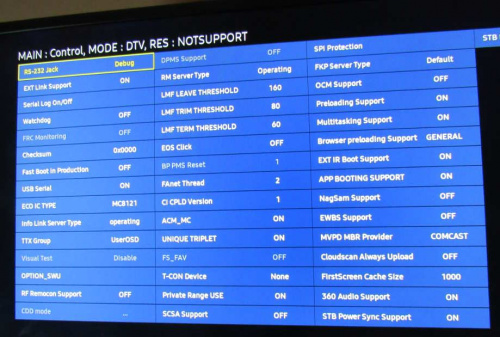
First you need enable USB Ex-Link for your TV in service menu. Try sequence Info -> Menu -> Mute -> Power or Info -> Settings -> Mute -> Power when TV turned off (may not work). Other way - if you have root, you can start service menu with command launch_app org.tizen.factory.
In service menu, go to Control -> Sub Option, change RS-232 Jack - Debug, EXT Link Support - ON, USB Serial - ON. You can also set Watchdog - OFF. On the other TV model, these options can be in another place of the service menu.
Cable
My TV have USB ExLink UART with 0V/3.3V voltage level. Not RS232 which can have -25V/+25V voltage level - see https://www.electronics-notes.com/articles/connectivity/serial-data-communications/rs232-signal-voltage-levels.php
Maybe other models will be with RS232, so it's better to check voltage before plugging something in Ex-Link enabled USB port. You accept that you do everything at YOUR OWN RISK.
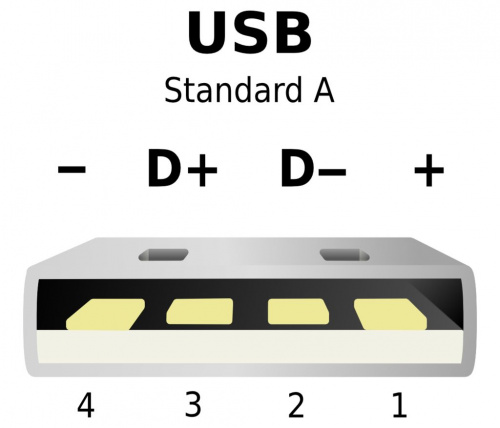
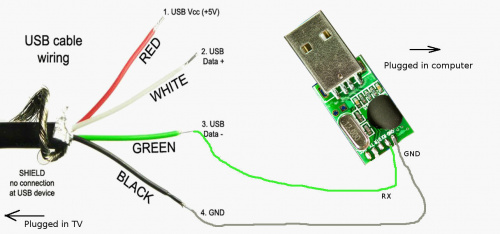
After making changes in the service menu, one of USB port will stop work like USB (TV will not detect flash drive plugged in it) - this USB port you need to use. Yon need some USB-UART 3.3V - like Nokia data cable CA-42/DKU-5. Connect UART wires to USB wires:
 TV USB GND   to GND UART
 TV USB DATA- to RX  UART
 TV USB DATA+ to TX  UART
todo
Start the terminal
Linux PC
On a Linux PC, install 'cu' (call up) tool from the uucp package and run
cu -l /dev/ttyUSB0 -s 115200
Windows PC
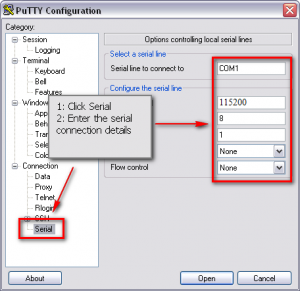
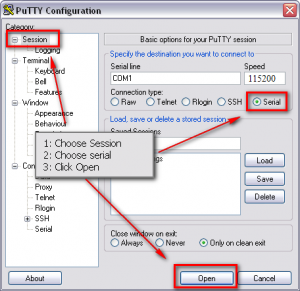
On Windows, we recommend the free terminal application Putty or RealTerm (download). But HyperTerminal is also very nice, but not free.
After you have started PuTTY, follow the steps in the screen shots below.
