Difference between revisions of "Enable Serial Console on B series TV"
Bastler0815 (talk | contribs) (→The Ex-Link (serial) cable for C-Series) |
m |
||
| (16 intermediate revisions by 3 users not shown) | |||
| Line 1: | Line 1: | ||
| − | Find below the steps you need to follow to enable console access to your TV via a serial cable. | + | Find below the steps you need to follow to enable console access to your '''A and B series CI TV''' via a serial cable. <br> |
| + | '''{{red|If your TV is NOT A or B series, this article is not for you, go to}}: [[Ex-Link Cable for C/D/E Series and BD players]]''' | ||
| + | <br> | ||
| + | == The Ex-Link (serial) cable for A and B series only== | ||
| + | *Solder yourself ( or buy ) an Ex-Link serial cable to connect to your Samsung TV. | ||
| − | + | Update: cable schematic is suitable also for J/K/M/Q series Tv`s as well! | |
| − | + | [[Ex-Link_Cable_for_J/K/M/Q_Series]] | |
| − | + | If you don`t have com port on your PC, you can buy usb to RS232 device from [http://www.ebay.com/sch/?_kw=usb+rs232 ebay or aliexpress] and you get virtual com port over USB. | |
[[File:Exlink.gif]] | [[File:Exlink.gif]] | ||
See [http://www.wiremunky.com/file/documents/exlink.gif here] for the Serial Cable specs. You can ignore the rest of the information posted there, as it is not applicable for the more recent Samsung devices. | See [http://www.wiremunky.com/file/documents/exlink.gif here] for the Serial Cable specs. You can ignore the rest of the information posted there, as it is not applicable for the more recent Samsung devices. | ||
| − | |||
| − | |||
| − | |||
| − | |||
| − | |||
| − | |||
| − | |||
| − | |||
| − | |||
| − | |||
| − | |||
| − | |||
| − | |||
| − | |||
| − | |||
| − | |||
| − | |||
| − | |||
| − | |||
| − | |||
| − | |||
| − | |||
| − | |||
| − | |||
== Configure your TV for Debug-Mode == | == Configure your TV for Debug-Mode == | ||
| Line 42: | Line 22: | ||
*Advanced => ADJUST => Debug mode [OFF][Debug smart][Debug runtime] | *Advanced => ADJUST => Debug mode [OFF][Debug smart][Debug runtime] | ||
| − | + | == Start the terminal == | |
| − | == Terminal Connection Parameters == | + | === Terminal Connection Parameters === |
*Use following connection parameters with your terminal-client ( e.g. Kermit, Hyper Therminal or ZOC Terminal ): | *Use following connection parameters with your terminal-client ( e.g. Kermit, Hyper Therminal or ZOC Terminal ): | ||
Baudrate: '''115200''' | Baudrate: '''115200''' | ||
| Line 51: | Line 31: | ||
Flow Control: '''none''' | Flow Control: '''none''' | ||
For Older models (like B530), you can try lower baudrates (like 9600 bps) | For Older models (like B530), you can try lower baudrates (like 9600 bps) | ||
| − | + | ===Linux PC=== | |
| + | On a Linux PC, install 'cu' (call up) tool from the ''uucp'' package and run | ||
| + | <pre>cu -l /dev/ttyUSB0 -s 115200</pre> | ||
| + | ===Windows PC=== | ||
| + | On a Windows PC, use Hyper Terminal or [http://www.chiark.greenend.org.uk/~sgtatham/putty/download.html Putty].<br> | ||
| + | After you have started PuTTY, follow the steps in the screen shots below.<br><br> | ||
| + | [[File:ExLinkPuttySettings1.png|300px]][[File:ExLinkPuttySettings2.png|300px]] | ||
| + | [[File:ExLinkPutty3.png|600px]] | ||
== Enabling Serial Input == | == Enabling Serial Input == | ||
| Line 64: | Line 51: | ||
| − | == Debug Menu (On CI+ | + | == Debug Menu (On B series CI+ models Too) == |
| − | *When you enter '1198282' numbers '''twice''' | + | *When you enter '1198282' numbers '''twice''' after '''debug''' string (each time confirm with ENTER), you will see TOP Debug Menu like that: |
==================================== | ==================================== | ||
Latest revision as of 16:23, 7 June 2017
Find below the steps you need to follow to enable console access to your A and B series CI TV via a serial cable.
If your TV is NOT A or B series, this article is not for you, go to: Ex-Link Cable for C/D/E Series and BD players
Contents
The Ex-Link (serial) cable for A and B series only
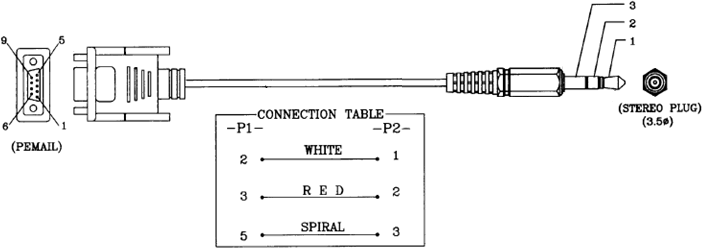
- Solder yourself ( or buy ) an Ex-Link serial cable to connect to your Samsung TV.
Update: cable schematic is suitable also for J/K/M/Q series Tv`s as well! Ex-Link_Cable_for_J/K/M/Q_Series
If you don`t have com port on your PC, you can buy usb to RS232 device from ebay or aliexpress and you get virtual com port over USB.
See here for the Serial Cable specs. You can ignore the rest of the information posted there, as it is not applicable for the more recent Samsung devices.
Configure your TV for Debug-Mode
- Enter Service Menu ( quickly push [INFO] [MENU] [MUTE] [POWER] on your remote control )
- Change setting for your RS232C interface to "debug" ( Control -> Sub Option -> RS-232 Jack -> [ Debug | UART | Logic ] )
Debug mode at older TV's like B530 series
- Enter Service Menu
- Enter "Advanced" menu. To activate `Advanced` menu need to type '0000'
- Advanced => ADJUST => Debug mode [OFF][Debug smart][Debug runtime]
Start the terminal
Terminal Connection Parameters
- Use following connection parameters with your terminal-client ( e.g. Kermit, Hyper Therminal or ZOC Terminal ):
Baudrate: 115200
Data bits: 8
Parity: none
Stop bits: 1
Flow Control: none
For Older models (like B530), you can try lower baudrates (like 9600 bps)
Linux PC
On a Linux PC, install 'cu' (call up) tool from the uucp package and run
cu -l /dev/ttyUSB0 -s 115200
Windows PC
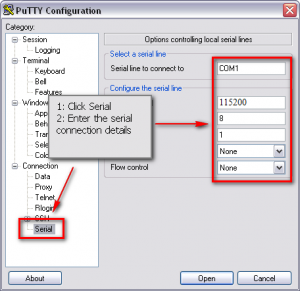
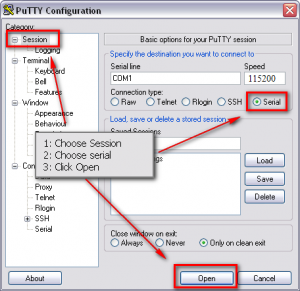
On a Windows PC, use Hyper Terminal or Putty.
After you have started PuTTY, follow the steps in the screen shots below.


Enabling Serial Input
- Switch on your TV ...
If you did everything right and everything works as expected, then you should see the boot-log on your terminal. - Enter "debug" at the invisible prompt ... to enable your serial console.
You should see something like below with each keystroke
[SERIAL INPUT MANAGE] 1-th ENABLE Magic serial input match!
[SERIAL INPUT MANAGE] 2-th ENABLE Magic serial input match!
[SERIAL INPUT MANAGE] 3-th ENABLE Magic serial input match!
[SERIAL INPUT MANAGE] 4-th ENABLE Magic serial input match!
[SERIAL INPUT MANAGE] 5-th ENABLE Magic serial input match!
[SERIAL INPUT MANAGE] serial input ENABLE!!!!!
Debug Menu (On B series CI+ models Too)
- When you enter '1198282' numbers twice after debug string (each time confirm with ENTER), you will see TOP Debug Menu like that:
====================================
[ TOP Debug Menu]
------------------------------------
1 : SubSystem Print On/Off
2 : Platform Print Setting
3 : TD Print Setting
4 : Performance Print Setting
5 : Sdal Print Setting
6 : Sdal Trace Setting
10 : Factory Debug
11 : TD Debug
12 : SubSystem DBG
20 : Performance File Write
21 : Louvre Print Setting
22 : JavaMW Print Setting
30 : Auto Lock DBG
------------------------------------
50 : ROSE Debug
60 : MediaLink Debug
70 : Jade Debug
====================================
99 : Exit
====================================
DBG> :
Activating the serial console from Debug Menu
- Enter TOP Debug Menu
- Than enter menu numbers 11 : TD Debug -> 0x04 : spI Debug -> 68 : Shell
will let you drop linux shell on CI devices. Is could true for CI+ devices too. But you cannot use characters on shell of CI+ devices, because kernel filters them, only numbers and enter allowed on CI+ devices...
This approach will do not kill exeDSP. So you don't needed to stop watchdog after dropping linux shell.
Activating the serial console (old way)
- Now you need to be fast ...
- hit CTRL-C, which stops the exeDSP binary
- immediately after that enter ( you have ca. 3 seconds ... I suggest you cut&paste this command ):
/mtd_boot/MicomCtrl 23
This now prevents your LED/LCD to stop and you have a command prompt of the TV-Console.
--Dynamic1969 16:17, 3 October 2009 (UTC)
--Erdem_ua 21:55, 15 January 2010 (EET)
