Difference between revisions of "Atari800 emulator"
m (→Joysticks) |
(→Joysticks) |
||
| Line 144: | Line 144: | ||
You can build a simple interface to translate original joystick signals to USB HID device commands. It requires some knowledge and is not very easy. In my opinion, the easiest way to connect Atari joystick is to attach it to the USB keyboard. How to do it? Open your USB keyboard, then locate PCB pins that are shorted by keyboard's keys. Search and choose 5 keys shorted to one common pin. In my keyboard, I found such keys: C, D, W, -, 2 and [ (even one extra key as you can see). Do not choose keys often used in games or operating system itself, like SPACE, ESC or ENTER. | You can build a simple interface to translate original joystick signals to USB HID device commands. It requires some knowledge and is not very easy. In my opinion, the easiest way to connect Atari joystick is to attach it to the USB keyboard. How to do it? Open your USB keyboard, then locate PCB pins that are shorted by keyboard's keys. Search and choose 5 keys shorted to one common pin. In my keyboard, I found such keys: C, D, W, -, 2 and [ (even one extra key as you can see). Do not choose keys often used in games or operating system itself, like SPACE, ESC or ENTER. | ||
| − | Then connect this common pin to pin 8 of Atari joystick (DB9 male connector - pin 8). All other keys can be connected in any order to the | + | Then connect this common pin to pin 8 of Atari joystick (DB9 male connector - pin 8). All other keys can be connected in any order to the Atari joystick pins: 1 (up), 2 (down), 3 (left), 4 (right) and 6 (fire). Then you have to configure your "keyboard" joystick in UI menu. That's all. |
| Line 162: | Line 162: | ||
Please don't use long cables to prevent troubles. Do not connect other devices than Atari joystick to your DB-9 connector. | Please don't use long cables to prevent troubles. Do not connect other devices than Atari joystick to your DB-9 connector. | ||
| + | |||
| + | Reference image: Atari/Commodore original joystick schematic: | ||
| + | |||
| + | [[File:C64joy.png]] | ||
== Mouse == | == Mouse == | ||
Revision as of 11:24, 1 August 2010
Atari800 emulator 2.1.0 RELEASE 2 for Samsung TV
Contents
What is it?
This is fully-functional Atari XL/XE (8-bit) emulator for Samsung TV-sets equipped with Content Library feature. Using this emulator you can run your favourite 8-bit software for Atari computers on your Samsung TV-set. This emulator has been ported from open-sourced Atari800 available earlier for many operating systems. This port is based on SDL version of the original.
Requirements
- Samsung TV set with Content Library feature (like LE40B650)
- USB keyboard (although many functions are available through remote control)
- ca. 2 MB of flash memory for emulator files + additional space for Atari software
- ca. 50% of CPU power
How to start
*** VERY IMPORTANT ***
First, you have to copy Atari ROM files (not included) on your pendrive. If you don't know how to dump ROM files from your Atari computer, then you can download Atari ROM files from:
Then extract all *.ROM files into Atari800/ROM subfolder on your pendrive.
You need ATARIBAS.ROM, ATARIOSB.ROM and ATARIXL.ROM files in there.
You should see such Atari800 directory structure:
[..]
[files]
   [..]
   (put Atari software files or disk images here)
[ROM]
   [..]
   ATARIBAS.ROM
   ATARIOSB.ROM
   ATARIXL.ROM
[DRV]
   [..]
   evdev.ko
   usbhid.ko
atari800.png
atari800.so
clmeta.dat
loader.so
You may copy Atari files (binaries, disk images) into [files] subdirectory. Create subfolders if you want to. Connect USB keyboard to your TV. You don't need to load HID modules, because emulator will load them for you. Insert pendrive with Atari800 folder into your TV's USB port, hit CONTENT (library) button, choose GAME, look for Atari800 and start. You may also copy it to the internal memory. You'll probably see SELF TEST screen first time. Please hit F1 key (MENU button) to configure or load a game or other tool.
You cannot use command line options as in classic Atari800 emulator. Command line options are not editable for user.
Keyboard
F1                   Built in user interface
F2                   Option key
F3                   Select key
F4                   Start key
F5                   Reset key ("warm reset")
Shift+F5             Reboot ("cold reset")
F6                   Help key (XL/XE only)
F7                   Break key
F8                   (not used)
F9                   Exit emulator
F10                  Save screenshot (may not work)
Shift+F10            Save interlaced screenshot (may not work)
LAlt+R               Run Atari program
LAlt+D               Disk management
LAlt+C               Cartridge management
LAlt+Y               Select system
LAlt+O               Sound settings
LAlt+W               Sound recording start/stop
LAlt+S               Save state file
LAlt+L               Load state file
LAlt+A               About the emulator
LAlt+F               Switch fullscreen (not used; always fullscreen)
LAlt+G               Switch WIDTH_MODE (so you can set 320x240)
LAlt+B               Switch BLACK-AND-WHITE
LAlt+J               Swap joysticks 0 and 1
LAlt+E               Switch bpp (for debug only)
LAlt+M               Grab mouse (prevents mouse pointer from leaving the window)
Insert               Insert line (Atari Shift+'>')
Ctrl+Insert          Insert character (Atari Ctrl+'>')
Shift+Ctrl+Insert    Shift+Ctrl+'>'
Delete               Delete line (Atari Shift+Backspace)
Shift+Backspace      Delete line (Atari Shift+Backspace)
Ctrl+Delete          Delete character (Atari Ctrl+Backspace)
Ctrl+Backspace       Delete character (Atari Ctrl+Backspace)
Shift+Ctrl+Delete    Shift+Ctrl+Backspace
Shift+Ctrl+Backspace Shift+Ctrl+Backspace
Home                 Clear (Atari Shift+'<')
Ctrl+Home            Ctrl+'<' (also clears screen)
Shift+Ctrl+Home      Shift+Ctrl+'<'
Up                   Up (Atari Ctrl+'-')
Down                 Down (Atari Ctrl+'=')
Left                 Left (Atari ctrl+'+')
Right                Right (Atari ctrl+'*')
Ctrl+Up              -
Ctrl+Down            =
Ctrl+Left            +
Ctrl+Right           *
Shift+Up             _ (Atari Shift+'-')
Shift+Down           | (Atari Shift+'=')
Shift+Left           \ (Atari Shift+'+')
Shift+Right          ^ (Atari Shift+'*')
Shift+Ctrl+Up        Shift+Ctrl+-
Shift+Ctrl+Down      Shift+Ctrl+=
`                    Atari/Inverse key
CAPSLOCK             CapsToggle (+Shift = CapsLock)
Joysticks
Apart from standard joysticks (handled by the SDL) up to two keyboard joysticks are supported. The keys used for joystick directions and the trigger can be freely defined in the config UI (Controller Config -> Define layout). Keyboard joystick emulation can be enabled/disabled in the Controller Config. By default, joy 0 is enabled and joy 1 is disabled (to not steal normal AWDS keys in the emulator).
Default joystick keys for first joystick device
numeric 8   - stick up
numeric 5   - stick down
numeric 4   - stick left
numeric 6   - stick right
right SHIFT - fire (trigger)
How to attach original Atari/Commodore joystick?
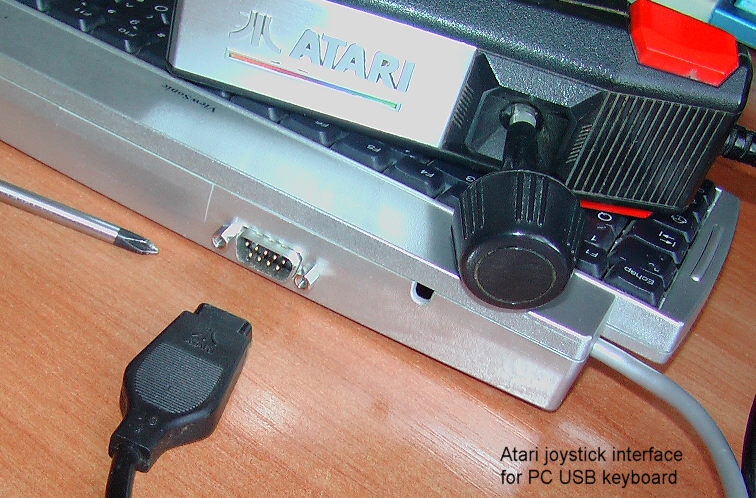
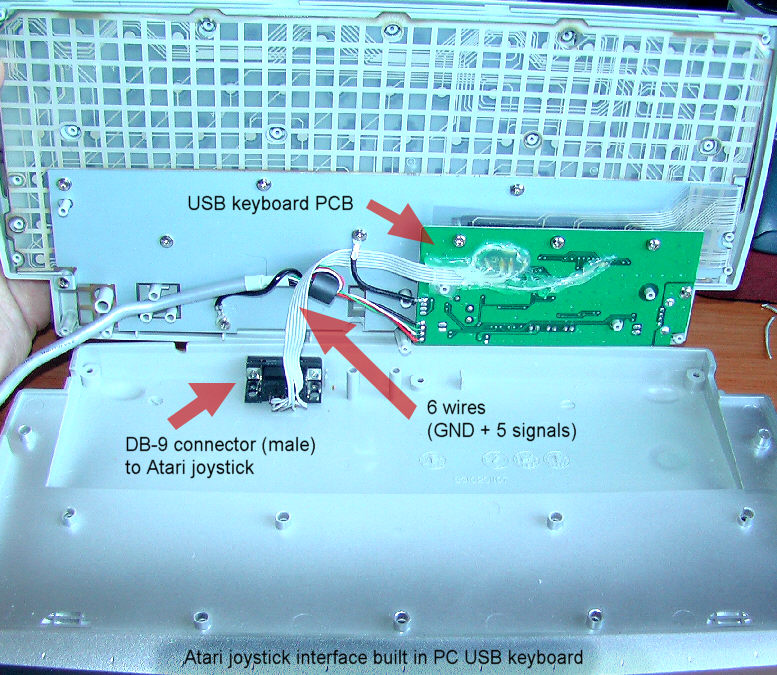
You can build a simple interface to translate original joystick signals to USB HID device commands. It requires some knowledge and is not very easy. In my opinion, the easiest way to connect Atari joystick is to attach it to the USB keyboard. How to do it? Open your USB keyboard, then locate PCB pins that are shorted by keyboard's keys. Search and choose 5 keys shorted to one common pin. In my keyboard, I found such keys: C, D, W, -, 2 and [ (even one extra key as you can see). Do not choose keys often used in games or operating system itself, like SPACE, ESC or ENTER.
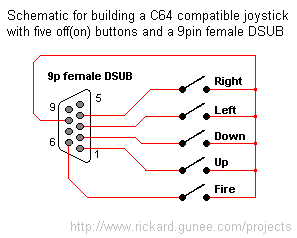
Then connect this common pin to pin 8 of Atari joystick (DB9 male connector - pin 8). All other keys can be connected in any order to the Atari joystick pins: 1 (up), 2 (down), 3 (left), 4 (right) and 6 (fire). Then you have to configure your "keyboard" joystick in UI menu. That's all.
This is the whole thing made in 2-3 hours:
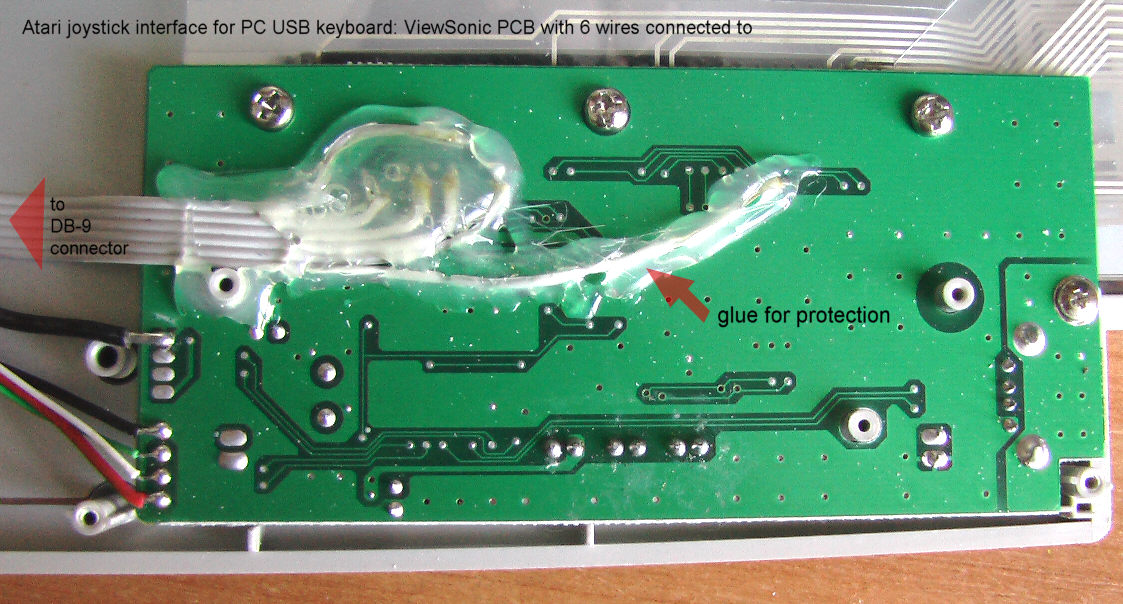
And this is the PCB itself (note that there are many different keyboards so there is no common schematic for every keyboard). Treat this description as an example. In your particular keyboard you have to use a piece of wire to test what PCB pins to attach to.
What is missing? You may add some protection circuits or elements to protect your keyboard's IC against electromagnetic fields or radio interferences.
Please don't use long cables to prevent troubles. Do not connect other devices than Atari joystick to your DB-9 connector.
Reference image: Atari/Commodore original joystick schematic:
Mouse
Paddles, Atari touch tablet, Koala pad, light pen, light gun, ST/Amiga mouse, Atari trak-ball, joystick and Atari 5200 analog controller are emulated using mouse.
USB mouse is supported but disabled by default. To enable mouse please select mouse mode in user interface menu.
Note that emulated mice like touch-tablet mice may not work.
Samsung remote control buttons
In general, prefered device is USB keyboard, but you can use remote control as well to emulate some Atari keys or call some special functions:
REMOTE    KEYBOARD/FUNCTION
------    -----------------
POWER     F9 (exit emulator)
TV        F7 (BREAK)
0...9     0...9 or ["],[A]...[I] or [-],[J]...[R] or [,],[S]...[Z],[.]
PRE-CH    letters/numbers mode for remote control keypad
SOURCE    LALT+G (screen width mode)
CH.LIST   LALT+C (cartridge management)
MENU      F1 (UI menu)
FAV CH    LALT+Y (select system)
cursors   cursors
ENTER     ENTER (RETURN)
INTERNET  F6 (HELP)
TOOLS     F1 (UI menu)
RETURN    ESC
EXIT      F9 (exit emulator)
red       F4 (START)
green     F3 (SELECT)
yellow    F2 (OPTION)
blue      F5 (RESET)
VOL+/-    master volume control
MUTE      mute/unmute sound
TTX/MIX   LALT+B (black and white mode)
MEDIA P.  LALT+O (sound settings)
CONTENT   F9 (exit emulator)
INFO      LALT+A (about emulator)
GUIDE     LALT+R (run Atari program)
SUBT      LSHIFT+F5 (cold RESET)
REWIND    BACKSPACE
PAUSE     CTRL+1 (Atari pause)
FORWARD   SPACE
RECORD    LALT+W (sound recording start/stop)
PLAY      F5 (START)

Other buttons are unused or blocked.
How to exit emulator
By remote control: hit TV, CONTENT or POWER button or hit MENU button (UI menu), then select "Exit Emulator"
By USB keyboard: press F9 key or press F1 key (UI menu), then select "Exit Emulator"
Where to get Atari games (ROMs) from ?
First, use Google or other web search engine to look for them. There are many websites hosting ROM files for old machines.
Here is an example list of FTP sites holding Atari ROM files (not tested!):
ftp.pigwa.net
atari.fornax.sk
ftp.klosz.art.pl
ftp.net-partner.pl
ftp.scene.org
ftp.spudster.org
ftp.taquart.art.pl
homepages.paradise.net.nz
llama.serverbox.org
marcer.dyndns.org
people.freenet.de / mrbacardi
ftp.funet.fi
trident.mcs.kent.edu
www.atari.cuprum.com.pl
www.umich.edu
How to access external USB device (pendrive or HDD) ?
FOR ADVANCED USERS! YOU NEED TELNET ACCESS!
If you copied Atari800 emulator to the internal memory, you can access only internal files. But you can create a symbolic link that will allow you to acces external directories like USB device. Run telnet, login to your tv, then type:
cd /mtd_tlib/GGame/Atari800/files
mkdir USB1
ln -s /dtv/usb/sda1 USB1
NOTES: verify if you have /mtd_tlib/GGame/Atari800 directory with copied emulator files before. Check your external pendrive path (/dtv/usb/sda1 in this example). You can add more links (USB2 to /dtv/usb/sdb1 for instance). Links are permanent. To remove them, simply remove created subdirectories (by command: rm -r USB1).
Known bugs
- delayed sound
- SOURCE and TTX/MIX buttons produce too fast actions (screen may flash)
- dirty margins in narrow width mode before UI menu was called
- PC USB tablets (even in mouse mode) may not work
- limited access to pendrive when executed from internal memory
- remote control buttons cannot be pressed simultaneously (quite obvious)
- remote control buttons cannot be used for joystick simulation
- not all Atari software works well (common problem for all software emulators)
- recorded WAV files or screen capture files cannot be deleted easily; they can be accessed using telnet or FTP
- ROM memory failed in SELF TEST; this is normal
- sometimes: abnormal termination on exit command called from "Crash Menu"
- sometimes: emulator slows down and sound is broken; please restart emulator
- screenshots may not be made correctly
PLEASE KNOW THAT THIS EMULATOR HAS NOT BEEN FULLY TESTED! SOME BUGS STILL CAN BE UNKNOWN!
Common problems
under construction
More information
You can find detailed information and source code on Atari800 project website: http://atari800.sourceforge.net/
Credits
Credits for original project:
http://atari800.cvs.sourceforge.net/atari800/atari800/DOC/CREDITS?rev=HEAD&content-type=text/vnd.viewcvs-markup

Samsung TV port (c)2010 by geo650 (SamyGO forum, Atari.Area forum) / sam650 (HDTV.com.pl forum)

with help of the following people:
- Fox (Atari.Area forum)
- Krótki (Atari.Area forum)
- maw (Atari.Area forum)
- arris69 (SamyGO forum)
- moras86 (SamyGO forum, HDTV.com.pl forum)
- nbd (SamyGO forum)
- doodlecz (SamyGO forum)
- erdem_ua (SamyGO forum founder)
- and other people from SamyGO forum
USB HID drivers come from SamyGO Files: [2] (SamyGO Mouse and Keyboard Modules v0.01.zip)
--Geo650 17:58, 31 July 2010 (UTC)


