Root access for D series Mstar cpu models
Important: hack doesn`t add Browser to your TV. Also no patches like ChannelInfo, BigYellowFonts and so on.
Just only SamyGO Extensions related features + DRM dissable(yet).
Contents
Enter to the developer account
1. Enter SmartHub (by pressing the smarthub button on the remote)
2. Press "Login" (A or red)
3. Enter the name: develop and password(any 6 digits)
Installing hack
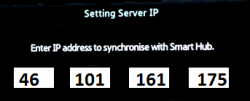
1. Go to Settings (blue or (D))-> Development -> Setting Server IP
2. Enter this IP:
3. Press User Application Synchronization
Wait until TV installs widget (SamyGO Extensions)...
Could take a while, depends from your internet speed. Wait until TV says "done"
NB! All other your widgets, installed from local server before were deleted!
4. Exit developer menu, exit SmartHub.
5. Return to SmartHub and you will find here new widget SamyGO. Execute it.
How to use
After starting SamyGO, you will notice that the tv shows up a virtual usb drive called "Server". As far as you can read in the forums, that virtual device is supposed to host the shares (samba, nfs, djmount). However it seems that this virtual device will only work correctly when SamyGO is used on an arm-based tv. During tests on a UE40D5700 it could not be used at all for anything. On trying to connect to that virtual drive from the tv's sources menu or from SmartHub, you'll end up with a never ending "loading wheel" and you can't see any shares, although you can see the shares on the tv using FTP. When you connect to the tv using FTP, you can see that there is a folder "/dtv/usb" which contains a subfolder called /sda1. This is the place where SamyGO mounts it shares by default. However the only way to access those mounted shares is as follows:
1. Ensure that SamyGO is not running.
2. Attach some USB Drive, no matter which type (successfully tested with an old 1 GiB flash drive) to USB 1 Port on the TV.
3. Start SamyGO
4. You can now access the mount points on /dtv/usb/sda1 by chosing that physically attached Drive from the sources menu.
There is no actual data stored on the drive, just the folders of the mount points are created there.
If you want to use SamyGO with network shares and use the PVR function too, please ensure to have a formatted recording media attached to USB Port 2 and the "mounting drive"
attached to Port 1. That is the only way it seems to work with the default SamyGO behavior and without changing anything in the service scripts.
FTP
Connect using any FTP client to TV`s 21 port.
user - no needed, leave blank
password - not required, leave blank
File manager
File manager is available at:
http://IP_of_TV/phpsysinfo/file.php
Shell
available only from unix terminal client (not windows!). Due kernel limitations telnet isn`t available on D series. We are using netcat shell instead (you get no promt "#" but have interactive shell.) use nc or telnet cmd:
nc IP_of_TV 1023
or
telnet IP_of_TV 1023
Read more SamyGO_Extensions and also on related B and C series forums (For D series same rules for setting it up as for B and C models)
NFS mounts are to be mounted on virtual USB device.
Please check you NFS server configuration and set up exports file properly.
If you don`t have NFS server on your local network, please disable this service.
If you are Windows user, probably you have to enable Samba.
WebGUI (test only)
Enter to browser:
http://IP_of_TV/cgi-bin/test.cgi
List of started services.
Possible to start/stop manually
This is just as test example, suggestions are welcome.
Samba client
Samba Client is enabled by default on Mstar. However it is necessary to provide login data. Empty fields will not work even when your shares are not protected in any way. In that case just pic random words. You can provide the user data on two ways:
- Create file (without extension)
smb_userdata:
USER="your username"
PASSWD="your password"
- Place this file to USB and attach to TV.
- Restart TV.
- Run SamyGO.
- Or you can change the init script itself to provide the necessary login data instead using a smb_userdata file on a usb device.
The init script is located here:
/mtd_rwdata/widgets/user/SamyGO/SamyGO/etc/init.d/04_04_samba.init
Other SAE features
Features, disabled by default. For enable it, conect over FTP and rename:
/mtd_rwdata/widgets/user/SamyGO/SamyGO/etc/init.d/service_name.init.dis
to
/mtd_rwdata/widgets/user/SamyGO/SamyGO/etc/init.d/service_name.init )
Restart TV.
Start SamyGO
Changelog for Mstar
2012-01-18 removed samba server (smbd)
2012-01-14 removed "Game Part", added DRM-Disable
2011-11-29 initial release
References
1. Related topic on SamyGO.TV
2. SamyGO_Extensions_Pack on wiki or forum
3. How_to_connect_C_series_to_NFS_under_WIN7_using_Hanewin_NFS_Server
4. How-to setup windows shares on windows7 to be accessible from TV.
5. FileShareWin7
